Now that we have setting up an Android emulator out of the way, let’s take a look at installing the Citrix XenApp 6.5 Mobile Application SDK and what the install does to a XenApp 6.5 server.
There are 2 parts that you need in order to develop applications that utilize mobile capabilities on a XenApp 6.5 server:
- The XenApp 6.5 Mobility Pack - this is the part that goes on the XenApp 6.5 server.
- The Citrix XenApp 6.5 Mobile Application SDK - this is the part you use to develop mobile applications.
XenApp 6.5 Mobility Pack
When you install the Mobility Pack, 2 new services are added to your XenApp server:
- Citrix Location and Sensor Virtual Channel Service - this service enables a server side application to leverage Location and Sensor capabilities.
- Citrix Mobile Receiver Virtual Channel Service - this service enables a server side application to use mobile device capabilities.
These 2 virtual channels are kept separate for security reasons. Maybe you want to have mobile device capabilities available, but you cannot enable GPS features due to security compliance. Location services are disabled on the Citrix Receiver by default. The way to enable the location capabilities is via Citrix policies. In order to use these policies, you will need to install the Citrix Group Policy Client-Side Extensions. These extensions are part of the XenApp Mobility Pack .zip file.
This policy is located under ICA\Client Sensors\Location. Notice that by default, location is disabled.
Citrix XenApp 6.5 Mobile Application SDK
So, the requirements for the Citrix XenApp 6.5 Mobile Application SDK state that you need Windows 7 64 bit (and the MSI is even named XenApp65MobileApplicationSdk64), but it installs to ..\Program Files (x86)\Citrix\MobilitySDK\. I tried installing the SDK on a Windows 7 32 bit system as well and it worked, so I’m not sure if something absolutely will not work on 32 bit.
I’m using Visual Studio for the examples. It appears that Visual Studio Express (free) will work as well, but I haven’t tested that myself.
Anyway, the documentation that comes with the SDK is pretty comprehensive so I’m not going to rehash it here. Since I will be showing you some of the examples using .Net, I do want to point out that you will need to run one of the following commands on your development machine in order for things to work:
Regsvr32 cmpcom.dll
Regsvr32 cmpcom64.dll
Notice that there is a 32 bit or a 64 bit DLL register. So again, not sure why Windows 7 64bit is a requirement for development. Anyway, make sure you run the appropriate command above as administrator, otherwise you may receive an error stating “The module was loaded but the call to DllRegisterServer failed with error code 0x80070005” (which is a permissions error).
Compiling Examples
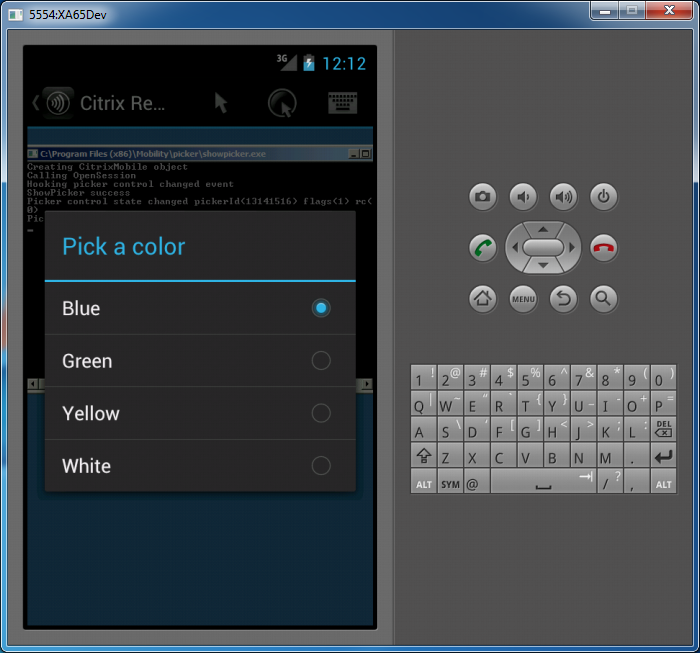
The final part of this article will focus on compiling and using the examples that come with the SDK. The one I’m going to point out here is the picker example. This example uses the native device’s UI to display a list of options. The example is actually a console application that has no graphics, so it is actually using the local device’s display mechanisms rather than trying to do some trickery on the XenApp server side. So, here we go…
- Browse to
\Program Files (x86)\Citrix\MobilitySDK\samples\native\showpicker - Double click on
showpicker.slnto open the solution in Visual Studio - Build the solution by pressing
F6 - This will create an executable in
\Program Files (x86)\Citrix\MobilitySDK\samples\native\Win32\Debug\showpicker.exe - Copy this
showpicker.exeto your XenApp 6.5 server (I copied mine to\Program Files (x86)\Mobility\picker\showpicker.exe) - Publish the application via Citrix AppCenter
- Launch the published application using an Android device (or emulator ) with the latest Citrix Receiver installed.
NOTE: You may receive an error message that states “The program can’t start because MSVCR100D.dll is missing from your computer…” Here’s why - the solution was built in debug mode. Thus, debug DLL’s (notice the “D” in the DLL name) need to be on the XenApp 6.5 server. Here is what you can do:
Copy:
- From: \Program Files (x86)\Microsoft Visual Studio 10.0\VC\redist\Debug_NonRedist\x86\Microsoft.VC100.DebugCRT\msvcr100d.dll on your development machine
- To: \Windows\SysWOW64\msvcr100d.dll on your XenApp 6.5 server
- Jeff Muir - Debugging XAMA SDK Applications
- Andrew Borzycki - Debugging applications remotely with Visual Studio
The Result
Here is what the end result looks like.
Once you pick one of the colors, the console application will give you feedback on the chosen item. When the appropriate receiver is available for iOS, then the native iOS selector would be shown with no code changes on the developer’s part. That is pretty cool!
In the next article on this topic, I will show you how to use mobile device orientation to change what is displayed to an end user. The example will include data and graphics. Stay tuned...

