At BriForum 2010, Brandon Shell and I presented a session on how to make the transition from MFCOM to PowerShell. At the end of the session, I presented several examples on how to use the XenApp PowerShell SDK in C#. I wanted to share some of the details on those examples in a few blog posts. This first blog post will detail what is needed to get started developing applications that leverage the Citrix XenApp 6 PowerShell SDK.
What you need
To get started, you need to set up a development environment. You really only need two things:
- Visual Studio (2005 or above is recommended). You can use Visual Studio Express (free) if you like.
- Citrix XenApp 6 PowerShell SDK
Actually, there isn’t anything set in stone that says you have to use Visual Studio, but it will make your life a whole lot easier. I recommend installing Visual Studio on a XenApp server because remoting in PowerShell is less than desirable for these examples.
Creating your first project
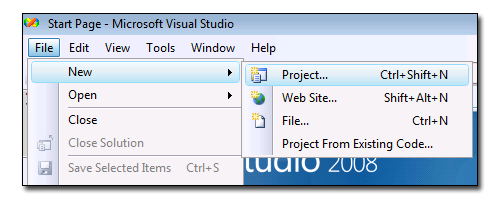
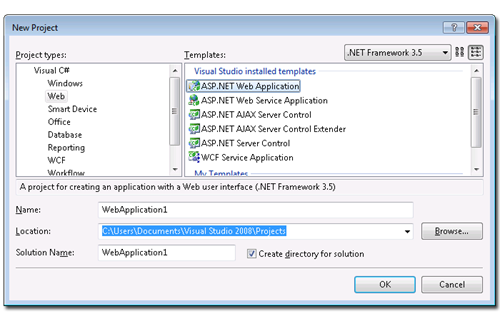
After you install Visual Studio and the Citrix XenApp 6 PowerShell SDK, you are ready to get started with your first project. The examples I will be showing will be web projects. So, launch Visual Studio and select File > New > Project…
Add a Reference to System.Management.Automation
After you create your Project, you need to add a reference to System.Management.Automation.dll in order to do stuff with PowerShell in your project. If you go looking for this DLL in the file system, you will find it at %ProgramFiles%\Reference Assemblies\Microsoft\WindowsPowerShell\v1.0 <- DO NOT USE THIS FILE. The version of System.Management.Automation you want is in the GAC.
Normally, if you want to add a reference to an assembly that lives in the GAC to your project, you can just right-click your project in Visual Studio, select Add Reference and browse for the name. But, for some reason, this assembly isn’t like the others. You actually have to close your project in Visual Studio and manually add a reference to System.Management.Automation by editing the .csproj file. For example, if your project name was WebApplication1, you would need to edit WebApplication1.csproj (you can use Notepad to edit this file if you like since this file is just XML) and manually add:
<Reference Include="System.Management.Automation" />
Once you manually add this reference to your project file, you will want to add a couple of using statement to your code files that will deal with PowerShell:
using System.Management.Automation;
using System.Management.Automation.Runspaces;
To Wrap or not to Wrap
There are basically two ways to use the Citrix XenApp 6 PoweShell SDK in a C# project:
- Use "traditional" PowerShell Runspace (uses common PowerShell Runspaces)
- Use the XenApp 6 wrapper assemply (wraps each command and paramter in a Class for safe typing)
There are pros and cons for both:
"Traditional" PowerShell Runspace pros:
- Easy to convert existing PowerShell scripts to C#.
- You can log all the PowerShell commands and save before running – kind or like Microsoft Exchange 2007 does.
"Traditional" PowerShell Runspace cons:
- No type safety – meaning that commands and parameters are specified as strings – which means you can mess up by typing the wrong string making troubleshooting difficult.
- No IntelliSense for XenApp commands/odjects in Visual Studio.
XenApp 6 Wrapper pros:
- Type safety. Every command and parameter is wrapped in a class so there is no chance of misspelling a string parameter or passing an incorrect parameter.
- Enables IntelliSense in Visual Studio.
XenApp 6 Wrapper cons:
- Does not translate well to PowerShell commands. For instance, the PowerShell command to get an application is Get-XAApplication. The wrapper assembly’s command is GetXAApplicationByName().
I like using the wrapper assembly personally, but in the end it is all the same.
What’s Next?
I’ll be writing a few more posts on concrete examples of using the XenApp 6 PowerShell SDK. Stay tuned…

